Imagine how fast you’d be able to provide quotes and send proposals if you didn’t have to worry about roof measurements.
Roof measurements may not be the toughest part of your job as a roofing contractor, but it does still take time—time that you could be spending winning other clients. So what if you could reduce that time to just under 3 hours?
As unbelievable as it sounds, it’s possible with roof measurement software. That’s not to say manual measurements don’t work, but if you’re looking to handle several clients simultaneously, manual roof measurements are just not efficient.
Luckily, you can use roof measuring software platforms like Roofr to streamline the process. In this way, you’ll be eliminating the need to drive down to a client’s house, get on a ladder, and measure by hand, giving you more time to build your business.
This guide discusses how you can measure roofs manually and provides some better alternatives if you’re looking for something more efficient. Most importantly, you’ll learn how to get roof measurements and reports in hours, not days. Let’s get to it.
How to manually measure roofs
Needless to say, you’ll need to get to the job site first before you can take any measurements. Then you’ll have to climb onto the roof and use your tools to measure each part of the roof as needed.
Roof measurement software eliminates this process, but for the sake of detailing what manual measurements usually entail, let’s have a look.
1. Calculate the square footage of the roof
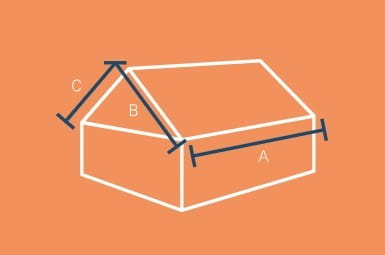
Once you’re on the roof, you’ll need to measure the area of each roof surface. By that, we mean you’ll have to record the length and the width of the roof surface and multiply them to get the square footage. Take this building, for example:

If B is 50 feet and A is 60 feet, the square footage is 3,000 sq ft. If C is also 50 feet, multiply that by A, which is 60 feet, and you’ll have another 3,000 sq ft.
Then you’d have to note if there are any obstructions, chimneys, or even skylights on the roof. Measure them in addition to any dormers on the roof. These parts don’t take up roofing material, so subtract them from the total area of the roof.
Next, you need to add the square footage from both surfaces to get the square footage. That means 3,000 sq ft plus 3,000 sq ft. The total square footage becomes 6,000 sq ft.
2. Calculate the pitch of the roof
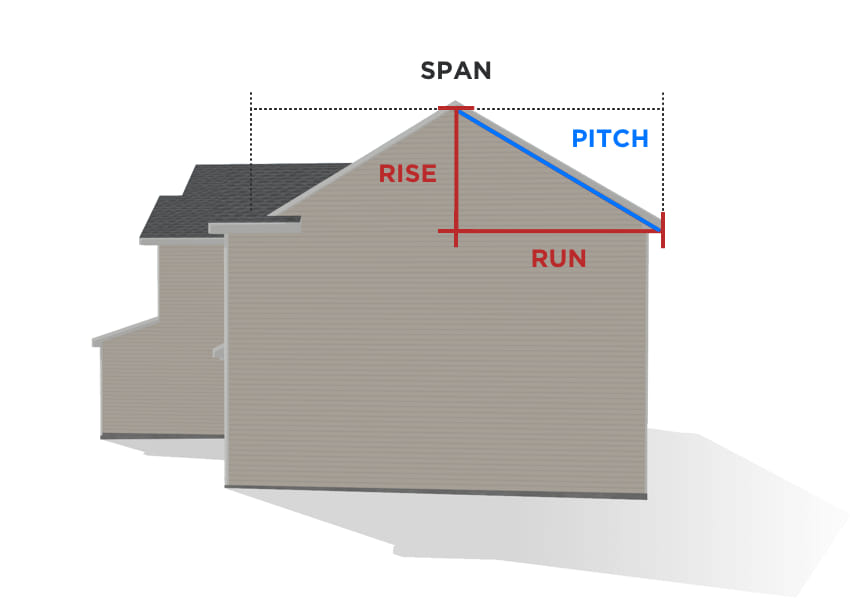
Next up is the roof slope (the roof pitch is also called the slope). To measure the slope, you’ll need to know the roof’s rise and run. That’s simply the vertical distance divided by a 12-inch horizontal distance.
For example, if the roof’s rise is 8, the pitch will be 8 inches out of 12.
Pitches vary depending on the type of roof (i.e., whether the roof is flat or steep).
This illustration should paint a clearer picture of the pitch for you:

3. Calculate the roof square
This is the final step in your roof measurement process, in which you should already have your square footage and your pitch. To calculate the roof’s size, divide the total square footage of the roof by 100. In this case, it’d be 6,000 sq ft by 100, which equals 60 squares.
Now, you can estimate the amount of supplies you’ll need for your roofing project. Truthfully, this process can be tiresome, especially if you have a lot on your plate. But that’s another reason you should use roof measurement software instead of doing everything by hand.
Why you shouldn’t measure roofs manually
Here are some reasons to avoid measuring roofs manually.
- First off, safety. There’s an inherent danger in the roof measurement process itself. You don’t need to risk yourself falling or fracturing a bone when you can measure a roof without ever climbing a ladder.
- To err is human—that phrase exists for a reason. You’re bound to make mistakes if you measure roofs with your hands. Using Roofr reduces the room for error, as its high-tech software handles all measurements and calculations. No more eyeballing, writing the wrong values, and misreading measurements.
- Hand measuring roofs simply extends the time it takes to close a client. You’ll have to visit the place, take measurements, make manual calculations, prepare a report, and so on. It’s a time-consuming process that you don’t necessarily have to do. With software, you’ll be able to meet a client with a detailed report in hand quicker, which tells them that you’re competent and can handle the job.
Now let’s talk about why you should choose Roofr of all the software platforms available on the market.
Roof measurement with Roofr
Thousands of roofers use Roofr as their go-to measurement software, and each one has a positive story to tell. But don’t take it from us. Here’s what Justin had to say:
“I’ve never experienced that level of service before. If I could rate any higher than a 10/10, I would. ”
Why? Justin had just 18 hours to take roof measurements and make estimates for 42 roofing projects. After scouring the internet and finding exorbitant prices, he found Roofr. For only $10 per report, Justin got his 42 roof reports in under 17 hours. Moreover, the reports were surprisingly accurate and detailed.
He’s an active Roofr subscriber today.
So why Roofr?
It’s a complete toolbox for roofers at an unbelievable price. All you have to do is
- Sign up for Roofr
- Enter the roof’s address from your user dashboard
- Get your roof measured by a dedicated team of experts
- Get a 6-page roof report highlighting total squares, hips, edges, and more
Alternatively, you can conduct your own measurements for free. Plus, you can access HD imagery, unlimited reports, and experts to show you around. If you want measurements you can trust, Roofr is your best bet.
